1. First part is always the same, making the general outline of the shape and cutting it into shape
2. A wooden piece was found in the workshop that replicated the dent at the rear.
THE THICKER EDGE OF THE WOODEN PIECE FIT THE CENTRAL PART OF THE DENT
THE THINNER EDGE OF THE PIECE FIT THE OUT PARTS OF THE DENT
(DIFFERENT SIZES OF THE WOODEN PIECE WAS USED AS THE DENT WAS MORE OF AN OVAL LIKE SHAPE)
3. This was bashed in using the wooden piece and the round head mallet on the sandbag.
SMASHING WOODEN PIECE ONTO METAL TO MAKE INDENT
4. I made a wooden piece with a sharp end to emphasise the dent
4. A curved form at the top and the bottom of the rear end was created using the curved metal shaper.
5. The sides of the metal shape are also curved in to join the side parts of the car. This was made using the tear shape metal shaper
6. A flat shaped metal shaper was also used to define the indent of the car
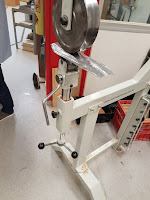
7. The nearly finished piece was put on the English Wheel to fix all the hammer dents
8. The piece was sanded and polished
PROGRESS AND FINISH
CHECKING HOW IT LOOKS ON MODEL BEFORE FINISHED
FINISHED PRODUCT
FINISHED PRODUCT ON MODEL
COMPLETELY FINISHED


No comments:
Post a Comment